This is Evenstar, a shawl designed by Susan Pandorf. The yarn is Findley, by Juniper Moon Farm, and I used a size US4 needle. I first used Findley to knit the baby afghan sample for Tanis Gray on the cover of the first Findley pattern book. The yarn is one of my favorite laceweights. The wide variety of colors and the yardage are excellent. I used over 3,000 glass Miyuke seed beads in the edging, knit perpendicularly, joined to the body of the shawl on every other row.
The overall size is 56" diameter. It is larger than I thought it would be, but I tend to block strenuously to open up the lace.
Blocking Notes:
I soaked the shawl for a few minutes in lukewarm water and a drop of Dawn dish washing soap. I rinsed it in water of the same temperature, and squeezed out the excess water gently (no wringing). I spread it out over a towel, rolled it up like a jellyroll, then squeezed the towel as hard as I could.
I pinned it to a piece of berber carpet I keep rolled up just for blocking big lace items. To make it round, I tied a white piece of yarn to a locking stitch marker and anchored the marker to the shawl's center with a few pins. I tied a knot at the other end of the string, at about 28”, and used it as a compass. First I divided the points into four sections, and I stretched out four individual corner points to the same radius measurement. (The shawl is circular, but when you pull and pin the first four pins, it looks like a square, so I call them corners.)
Then, I pinned every other point in between the four main corner pins, using the white string to keep the same radius. I pinned the remaining points, again using the white string as a radius measurement.
After all was pinned, I adjusted a few of the pins to make sure the points looked even and removed my makeshift compass. I sprayed the whole shawl lightly with water and let it dry overnight.
The next day, when the shawl was dry, I sprayed it lightly with Niagara spray starch and let it dry for a couple of hours with the pins still in it.. I only do this if I know it’s likely I will wash and block the shawl again after using it. If it’s going to be stored, I don’t starch. Starch can cause staining and it also attracts bugs.
To store it or to transport it, I prefer rolling it around a cardboard tube. This helps prevent creases and wrinkles. For very large items, I fold them first in a tablecloth and then roll them around a tube. The whole thing can be then wrapped in tissue paper, the ends of the tissue stuffed in the holes at both ends of the tube.
A #6 aluminum needle has been known to furnish an excellent emergency shearpin for an outboard motor. ~Elizabeth Zimmermann
Monday, May 27, 2013
Tuesday, May 21, 2013
Marguerite Shimmons' Doilies at Rengstorff House.
![]() |
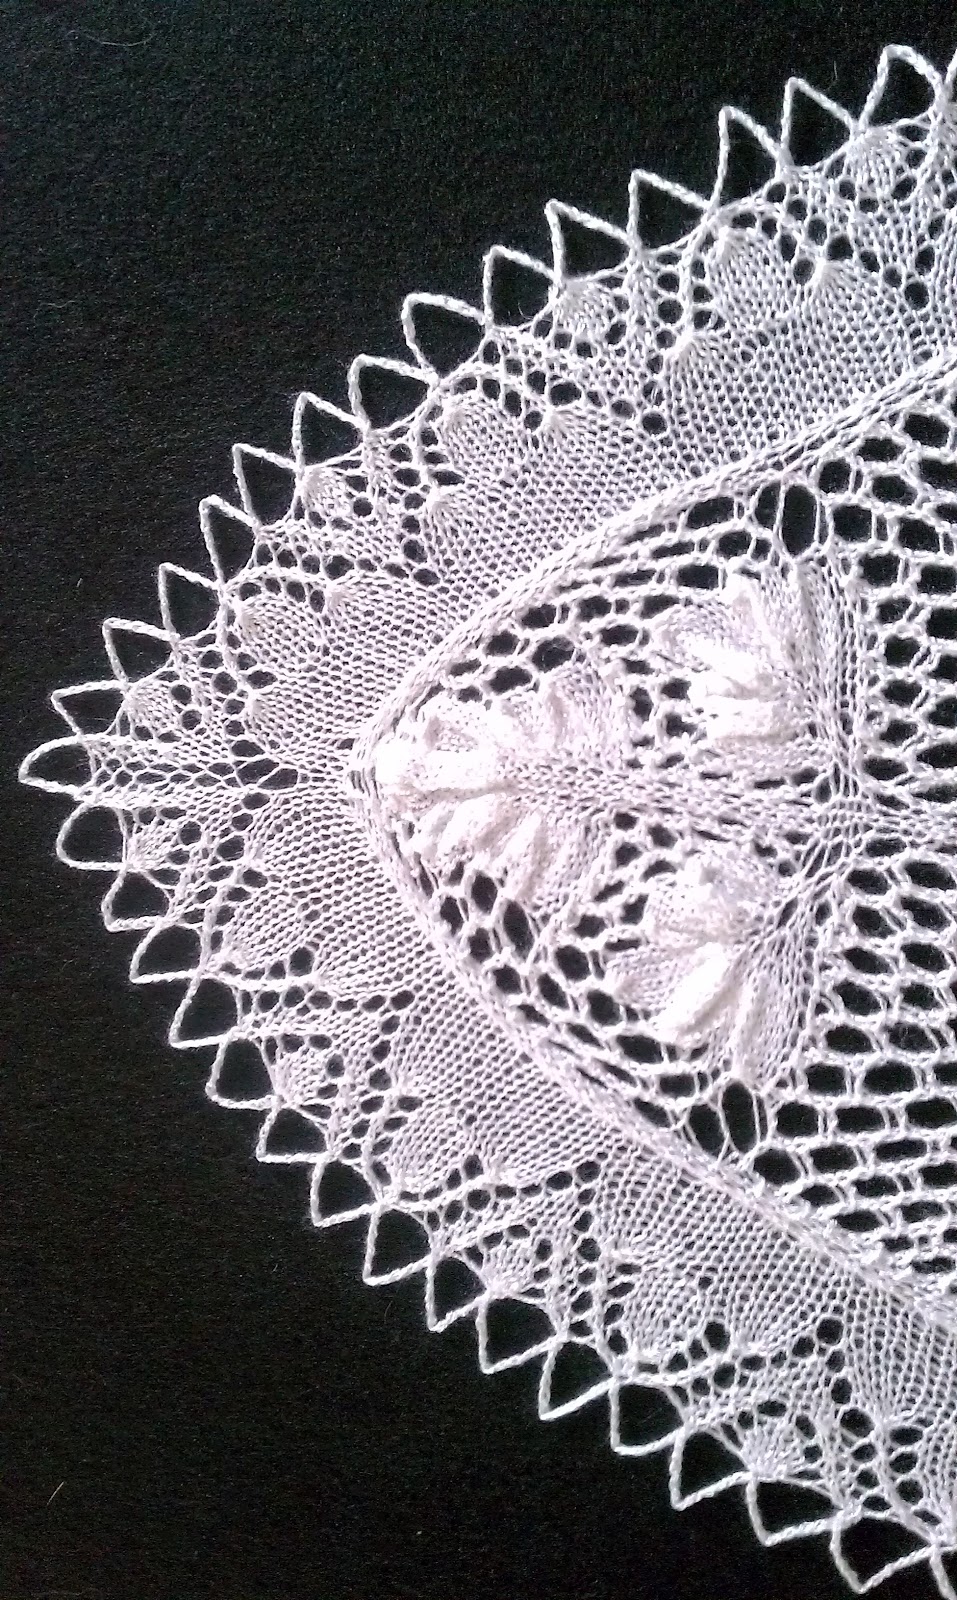
Intermezzo, a doily I knitted from a pattern attributed to Herbert Niebling silk and wool, 2mm needles Zwei Deckchen Kungstgestrickt, Art No 060 01 0007 |
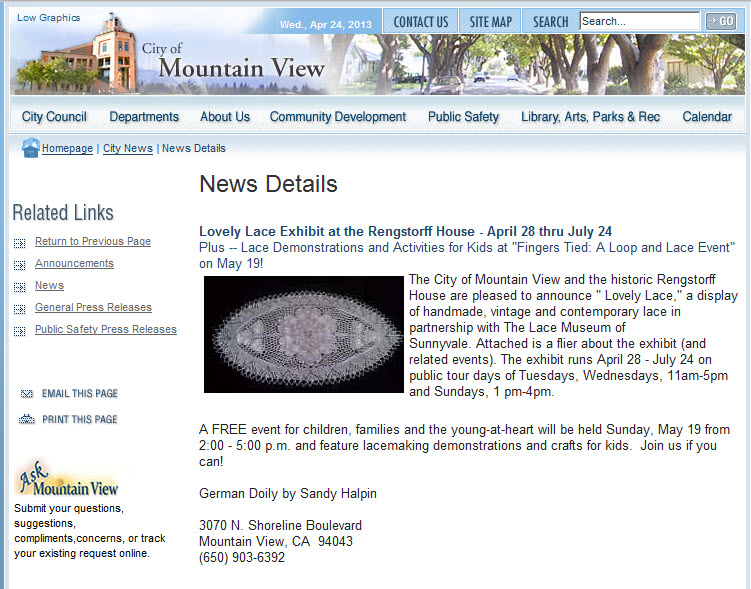
Outside in the courtyard were demonstrations of lace and crafts, including bobbin lace, what looked like Chantilly lace, and some other fascinating things like lanyard making and hula hoop rug weaving. Interesting. The idea was to have a family type of event, but most of the people who attended were older, and just a couple of younger people were at the demo tables.
Traffic and Disobedience

In addition, Shoreline Amphitheatre was hosting Live105's BFD concert, with about 25 bands and the traffic on Rengstorff and Amphitheatre Parkway was horrendous.
With about two blocks to go, I was fed up and decided to try something I don't recommend, but it worked. I turned on my warning flashers, and cut into the opposing traffic lane. I zoomed down to the stop light where a traffic guard flagged me down to stop. (Note to my peers: please do not attempt this dangerous maneuver.)
I said with authority, "I'm an exhibitor at Rengstorff House, and I need to get there right away. I'm not going to the concert."
"I'm sorry, I can't let you go. You have to wait in line."
"I need to turn left at the stoplight. I'm not turning right into the concert."
The traffic guard said tiredly, "Okay, just pretend you work here."
Paul was somewhat impressed with my assertiveness (and that I dared to drive on the wrong side of the road - so unlike me). "Way to go!"
We met up with Nina and Jane, my fellow knitters, and had lunch at the Lakeside Cafe, just down the road from Rengstorff House. The cafe has a great brunch menu, and an outdoor seating area adjacent to a manmade lake where local, overweight squirrels wait patiently for visitors to drop french fries.
Marguerite Shimmons' Doilies
![]() |
Charles Grant, docent, who dances like Fred Astaire |
But the true reason for my attendance, and the best things I've seen in a long time, were Marguerite Shimmons' doilies. Marguerite was a lifelong, prolific knitter, who made over a thousand lace pieces in her lifetime. The Lace Museum in Sunnyvale and Lacis Museum of Lace and Textiles in Berkeley have each benefitted by the donation of her lacework. We were very fortunate to see some of her masterworks close-up. These small works of art, each unique and lovely in its own way, provided us glimpses of perfection usually only seen in museums.
Many of her doilies were knit from patterns designed by Herbert Niebling, a mid-20th-century lace designer extraordinaire. As his designs are becoming more admired by knitters around the world, the patterns are slowly being re-released. I've made a few, and collected many of his patterns that I hope to knit in the future. Some of Marguerite's doilies were designed by Christine Duchrow, and some were combinations of multiple patterns, devised by Marguerite herself.
I've used very fine cotton, silk and wool, and even cashmere to make a lace doily. I've not yet used thread as fine as Marguerite Shimmons used. Her typical thread was 100-weight cotton that is often deployed for tatting and bobbin lace. Miraculously, her stitch tension is perfect, even in the most complicated patterns. I've examined these carefully, and her work is exquisite.
Gracie Larsen, founder of The Lace Museum, and The Lacy Knitters Guild of Mountain View are keeping this art alive -- I'm a huge fan and a member of the Guild. To join The Lacy Knitters and receive the newsletter with patterns and information, please check out the Guild's website.
![]() |
Nue Mode #5207/5 K44744, 69 rounds, 11" diameter |
![]() |
Die Kleine Diana K1399, 63 rounds, 12.5" diameter |
![]() |
Die Kleine Diana K1399, Burda #523, 56 rounds, 10" diameter |
![]() |
Knitted Lace Patterns of Christine Duchrow, vol 2, pattern 54/2 modified, 11" diameter |
![]() |
Two patterns uniquely combined by artist, 14.5" diameter: Admiration, 37 rounds, combined with Kunststricken #720/19, 23 rounds |
![]() |
Ambition, 22 rounds center, 40 rows ea for two side wings, 14 round edging, 15" oval |
![]() |
Kunststricken #720, 85 rounds, 12" oblong |
![]() |
Die Kleine Diana K4474, 74 rouinds, 14.5" diameter |
Wednesday, April 24, 2013
Lovely Lace at Rengstorff House
Two of my lace doilies will be on exhibit at Rengstorff House in Mountain View, CA.
The Lovely Lace exhibit, sponsored by The Lace Museum in Sunnyvale, will run from April 28 - July 24, with a special family day on May 19. On family day, they will have lace-making demonstrations and kids activities.
This was a surprise for me: The City of Mountain View featured my doily on its event page!
Sunday, March 03, 2013
Dreambird and a Swing Knitting Class
Oh, Dreambird. I've learned to love you, but it's been a rocky relationship. In the beginning, I was infatuated with your bright colors and curvy shape. You promised to be exciting, with daring twists and turns. Little did I know how you would taunt me.
Engulfed in passion, I knit two feathers back in January. The pattern, translated from German to English, was confusing at first, but then the designer released a chart with stich counts per row that made the knitting go more smoothly. I'm about halfway done, and I'm enjoying it so much, I think I may make another with different yarn and colors.
This technique of Swing Knitting spurred me to look for other patterns and for guidance.
Since I became enamored with the Dreambird pattern, I decided to take a Swing Knitting class at Stitches West with Brigitte Elliott. Brigitte went to Germany to learn about Swing Knitting from its pioneers. The Stitches class was sold out, but fortunately, I was on the waitlist, and I got a call a week or two before Stitches began -- I was in!
Brigitte is a marvelous teacher. She is very patient, yet takes into consideration that some students are advanced and want to forge ahead. Her printed course materials are easy to follow and complete, including references. She provided formulae for creating our own swing knitting designs, as well as tried-and-true techniques, like placing locking stitch markers or pins to indicate turns. She also brought several examples of swing knitting that she had created. I'm excited that she's working on new patterns using this technique.
She also presented a slide show with examples of inspiring Swing Knitting wall art. Take a look at this German website to see what beautiful works of art have been created with Swing Knitting. (When you get there, click on Gestrickte Kunst to view the artwork.)
Skacel provided all the materials for this class for free. Not only did we receive three balls of yarn, but also an Addi Lace circular needle. The yarn provided included a Zauberball variegated that really pops against the solid color background.
If you are considering beginning your own swing knitting project, I would advise joining the Swing Knitting group on Ravelry. Also, take a few moments to learn German short rows from a Youtube video. No wraps are required, it's simple and leaves no holes in the knitted fabric.
Monday, January 28, 2013
Dreambird: 2 Feathers
First two feathers of my Dreambird are completed. You can see where this is headed. The lighting for this photo isn't great, but I'm happy with the progress thus far.
The row-by-row chart in English was released and already updated once (separate file). It did clear up at least one bit of confusion, which is why there may be a couple of rows extra between my feathers one and two and less between subsequent feathers. As an example, the pattern may indicate "knit back" when you only need to knit back to the last double stitch, rather than all the way to the end.
I've found it's helpful to read the row-by-row chart, just prior to knitting the next pattern Step. I may write the number of stitches next to each Step on my copy, just to avoid any confusion.
I'm now ready to zoom through this pattern and complete it, possibly before Stitches West in February!
Thursday, January 24, 2013
Dreambird
While roaming around on Ravelry, I noticed a lovely pattern called Dreambird, based on the Swing Knitting fad that has leapt from Europe to America. So popular is this soon-to-be-ubiquitous, short-row technique that all of the Swing Knitting classes at Stitches West are sold out. (I am on the waitlist for either a Saturday or Sunday class.)
Silly me, I latched onto the Dreambird pattern as soon as I saw it.
The pattern was originally written in German, I believe. Then it was translated into English, French, Dutch, Russian, Spanish, etc. Thankfully, the designer speaks English rather fluently, but with the weird quirks that come from learning English as a second or third language. Some of the original English-speaking KAL members are frustrated and some have dropped out. I am now patiently waiting for a promised pattern update that will decipher the pattern's now infamous turn-by-turn instructions. The designer is very responsive, and I do believe she will address all issues.
My simple beginning has turned into the elephant in my knitting bag, demanding attention, yet I'm trying to ignore it in favor of finishing the Evenstar shawl, at least until the pattern update is released.
Swing knitting aficionados are enamored with the use of pins to mark the turns in their work. These can be especially important when creating the more complicated swing pieces you may have already seen popping up on knitting websites and in magazines. For the Dreambird, they are not especially critical, but they are a good introduction to the use of pins to mark the German short-row turns.
My humble beginning:
Silly me, I latched onto the Dreambird pattern as soon as I saw it.
![]() |
Photo: Nadita Swings |
Pretty bird! The designer started a KAL and offered the pattern at a reduced price until the end of February. I couldn't resist. I downloaded it and paid all of 3.50 EUR. No biggie, right?
The pattern was originally written in German, I believe. Then it was translated into English, French, Dutch, Russian, Spanish, etc. Thankfully, the designer speaks English rather fluently, but with the weird quirks that come from learning English as a second or third language. Some of the original English-speaking KAL members are frustrated and some have dropped out. I am now patiently waiting for a promised pattern update that will decipher the pattern's now infamous turn-by-turn instructions. The designer is very responsive, and I do believe she will address all issues.
My simple beginning has turned into the elephant in my knitting bag, demanding attention, yet I'm trying to ignore it in favor of finishing the Evenstar shawl, at least until the pattern update is released.
Swing knitting aficionados are enamored with the use of pins to mark the turns in their work. These can be especially important when creating the more complicated swing pieces you may have already seen popping up on knitting websites and in magazines. For the Dreambird, they are not especially critical, but they are a good introduction to the use of pins to mark the German short-row turns.
My humble beginning:
Tuesday, October 30, 2012
Evenstar - Beginning Beaded Border
![]() |
Headed for the border |
![]() |
A peek at the central portion |
![]() |
Miyuki - Japanese glass beads |
![]() |
Starting the border |
For the beading, I purl the stitch that requires the bead, then I transfer it back to the left needle. I pick up a bead with the #10 crochet hook. I pull the transferred stitch off of the left needle with the hook and slide it through the bead. Then I move the stitch with the bead over to the right needle. Then I tug the working yarn a bit to snug up the beaded stitch. Like I said, the process will slow you down, but as you do more, it becomes a rhythm, and you will get faster and faster.
The work stays to the left as I knit the right side rows, and to the right on the wrong side rows.Using the DPN makes it easy for me to flip the work back and forth. I tend to keep the crochet hook behind my right ear or resting on my lap. The seed beads are in a flat, round container, about 2" in diameter that has a tight-fitting lid. I keep a single layer of beads in the container and replenish as needed. It's helpful to set the bead container on a cloth, or non-slippery surface, so it doesn't move around as you are picking up beads.
Ellie wants me to post photos of the completed shawl very soon so we can get back to our regular play schedule :)
![]() |
Ellie hopes that I'll be finished very soon |
Tuesday, September 18, 2012
Tulip Dress and Evenstar
I made this sweet little pink Tulip Lace Dress for my friend's grandbaby, due in October. It's a free pattern on Paton's website, but you do need to sign in to download. The yarn is Paton's Grace, 100% mercerized cotton. Although the yarn suggests hand washing, I put this through the washer and dryer (with fingers crossed) and it came out perfectly.
The project on my needles at the moment is Evenstar by Susan Pandorf. It's a lovely design, and I'm hoping it turns out as well as some of those I've seen on Ravelry. The yarn is Findley, by Juniper Moon Farms and the color is Renaissance. You can find it many yarn stores. I've just started Chart 3 and have graduated to a 47" Addi lace needle, size US3. This shawl is going to be pretty large, maybe 60" in diameter.
My first Findley project was the Lace Baby Blanket I knit for Tanis Gray for the Findley launch. The book is still available. That's the blanket on the cover.
Monday, July 23, 2012
Krokus at the California State Fair 2012
At the California State Fair Awards Ceremony |
Last weekend was the California State Fair awards ceremony. Paul and I had decided to attend when I received a notice in the mail that my blue Krokus, a table center designed by Herbert Niebling, had won First Place, Best of Class and Best of Division. I was so excited! Paul and my friends Nora and Jeanne and I trooped through the blistering heat of the Fair together.
Due to this extreme heat in Sacramento, the awards ceremony was not well-attended. Even though the awards were held in the morning at 10 a.m., the temperature was already up, around 90 degrees F. By the afternoon, it was over 100, and people were wilting.
Krokus won two ribbons! |
The Master of Ceremonies cracked a few jokes and handed out the 20 Golden Bear trophies to the Best of Show winners. The other winners got ribbons. No trophies for me this year, but maybe next time. I was happy with my two ribbons!
![]() |
The Golden Bear Trophy |
The Best of Show winner: a crochet table covering |
Announcing the special awards inside the Exhibit Hall |
![]() |
JD's special Salsa Seasoning |
At first I was skeptical of this seasoning from Minnesota, but it's really good, and can be used for dips or salsa or seasoning meat or veggies.
Two lovely shawls |
The green Estonian lace shawl on the left was beautiful, but it was hard to see the stitchwork because of the way it was draped. I felt the same about the way mine was displayed. It would have been nice to see all the detail, with the lace spread out over a table.
Another beautiful shawl |
More beautiful work |
The large quilt is made entirely of silk ties |
Spanish Peacock from A Gathering of Lace, Meg Swansen |
We decided to have lunch in restaurant at Arden Fair Mall rather than swelter outside and eat Fair food. Ahh, air conditioned relief!
Nora and Jeanne headed back to the city, and Paul and I checked into Le Rivage Hotel next to the Sacramento River. We had a lovely view, but it was impossible to sit outside on the balcony for more than a few minutes in the heat.
I will never complain about fog again. :)
Tuesday, May 29, 2012
Trollblume
And here is Trollblume, a.k.a. the Troll, the result of a KAL conducted by the Niebling Lace Knitters on Yahoo. I used a no-name silk from my stash and US0 (2mm) needle.
The flowers are sculpted, meaning they bunch up and look a little puffy. This is by design, although I don't recall seeing another Niebling design with sculpy flowers. It makes me wonder about the origin of the design, and whether this was experimental or a collaborative work by Niebling and an assistant. Who knows?
The center was knitted first on DPNs, then the leaves on each side were knitted individually, while the sides remained on stitch holders. It was a little awkward having those stitch holders dangling off of the sides while knitting. The group mistresses suggested binding off the sides, and then picking up stitches all the way around to improve the shape and ease blocking, but I chose to follow the original design as written.
Making the two pointed ends look alike was a bit challenging. The start and end of each border round was at one pointed end, and the other pointed end was the center of the round and included a double yarnover. The KAL directions suggested adding a ktbl at the pointed ends, but being a traditionalist, I went with the original instructions. Overall, I'm pleased with the result.
Subscribe to:
Posts (Atom)